Showing posts with label crafts. Show all posts

August 17, 2010

The 5 Year Quilt

Almost a month ago, we signed up for Netflix (and the connection between that and my blogging lapse is merely coincidence ;) ).
When I sit down to watch TV, I try to have something for my hands to do. I had started a lap-size quilt around 5 years ago, and had stopped once I pinned the layers together. Moving, teaching, having a baby, etc. tends to do that to projects.
The quilt is all hand-stitched, and measures 42" square. As this was my first attempt at quilting a quilt not in a frame, I quilted strictly "in the ditch." My quilting isn't too bad, but this is as close a view of the quilt as you're going to see! ;)
Overall, I'm pleased with how my first attempt turned out, but I don't think I'll try another anytime soon.

June 17, 2010

Canvas Wall Art

I really like the canvas word art that has become popular. But most of it is sadly out of my price range. So I decided I can either keep looking wistfully, or come up with a way to do something similar on my own.
I started off with some text that I wanted to use. I chose 1 Corinthians 13, since that chapter was read at my wedding. Plus, let's be honest - who couldn't use a good reminder of what love is from time to time? I picked out the words that described what love is, and then I played around with arranging them, using some chipboard letters I had left over.

After I figured out what order I wanted the words to be in, I transfered the letters onto the canvas I was going to use.

I initially was going to tape the letters onto the canvas before the next part, but I had the idea to use stickers instead. Not only did I save time by not having to tape down each letter, I also got to mix and match the font.
After I arranged the stickers in place of the letters, it was time to paint. I was going to do a solid black coat of paint, but my can of black spray paint is apparently running low. I ended up really liking how this looked.

After the paint was dry, I peeled off the stickers. I left the ones that spell out love to give the work some visual interest.

After I was through, I liked the end result so much that I made a similar canvas using Philippians 4:8.


I already had the paint and the stickers for this project. The only thing I had to buy was the 2-pack of canvas for $7 at Hobby Lobby. Not to bad, huh?

June 11, 2010

Eye Chart Art

I'm back with some more wall art, after being inspired yet again by Britt. I seem to be in a wall art kick right now. I have one more wall art project to show off after this, and then I promise I'll try to find something else to post about :)
Britt's version of this turned out much better, so if you're going to copy this idea, go to her blog :) For my project, I used words from one of the songs sung at my wedding:
Grow old along with me, the best is yet to be.
God bless our love.
I played around with the spacing and text size until I found what could accommodate the text and still look similar to an eye chart. I think the key for this to look more like a real eye chart is to have less text. Still, the end result turned out interesting enough:

In case you're wondering about the mat choice, I just used a mat that I had on hand. This is yet another free project. I want to use either a different color mat (but what color?) or reprint this with no mat, but I haven't made up my mind yet. Suggestions?

June 8, 2010

Key Art

Awhile back, John and Sherry (of Young House Love fame) posted about their unique, memorable art around their house. I liked several of their ideas, but the one that stood out the most to me was their shadow box of framed keys.

I'm not much of a pack rat, but I do save keys. The top two are the keys to our childhood homes, and the bottom three are for the three places we've lived since we were married. I waited until shadow boxes were 50% off at Hobby Lobby and snagged this 8"x10" box for $10. For the tags, I ripped up some scrap paper that I already had.
What are some unique and personal things that you have framed?

June 7, 2010

Button Art

When Britt posted her fabulous button art, I knew that I had to copy. I already had a "c" hanging on my living room wall, so using Britt as inspiration, I decided to glam up my C.
I didn't think to take a picture of my C before, but I'm sure you probably have seen one before ;) So here's a shot of the after:
I covered the front and sides of my letter with buttons. I had previously painted my letter C black, which helped the little gaps here and there to blend in. Of course, like Britt pointed out, you could do a different button color than your letter if you wanted that contrast.
My letter only took a couple of hours from start to finish. I tend to do my crafts while I watch TV, which probably accounts for this project taking so long - and my burned fingers!
After I hung my letter on the wall, it looked a bit forlorn all by itself. I decided to frame my letter like Britt did, and using a backless frame that I had on hand, here's the finished result:
Since I already had the C, the frame, and the buttons, this project was totally free!

April 30, 2010

BB's Sensory Tub

Tara at Feels Like Home posted about her daughter's sensory tub yesterday. Since BB loves digging, I knew he'd like this activity. I had the idea to make BB's tub into a scavenger hunt.

I put some rice and popcorn kernels in a Rubbermaid container. I then went around the house and found some small toys to bury in the container.

Any good scavenger hunt has a list to check off, so I made one for BB using my printer's scanner. When BB found an item, he matched up the item with the item's picture.

We've played with this 3 times already. After a while, I think I will change up the items hidden and add some more rice to make it a bit more of a challenge.

For a child that can read, the pictures could be omitted, requiring the child to match the item with the description of the item.

April 12, 2010

Trash to Treasure

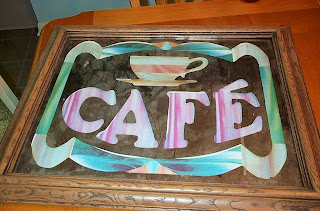
I was at Goodwill today and spotted this:

I can't help but wonder where, oh where, this sign fit in. 80's coffee shop? Some type of island-themed cafe? You can't tell from the picture, but the frame was mega gross. I have honestly never seen such a flimsy plastic used for a frame - of a mirror, no less!
The cardboard back had started to curl away from the mirrored glass, enabling me to see that the tacky pastels were printed on paper:

After taking the picture apart, I flipped over the paper, spray painted it, and stuck it all in a new frame:


The original picture was $5 (hooray for Goodwill's color of the week!), and the frame (also at Goodwill) was $8. The mirror hangs almost directly across from the window in my kitchen so that it will help bounce the light around.
There's a little bit of damage to the mirrored portion of the glass, but I think it adds character. Sorry for such a crummy picture, but it's really hard to take a picture of a mirror and not be in the picture yourself!

March 24, 2010

Cheap Art

After my bathroom's makeover, I needed some art for the walls. I have a horrible time finding art that I like. I scoured etsy, ebay, and my local stores. I had a mental picture of what I wanted, but I couldn't find it. When you can't find what you want, you either have to do without or make it yourself. Needless to say, I chose the later option.
I started off by doing a Google images search for common bathroom items. I limited my search to line drawings since I wanted simple pictures.
Then I went to Michael's. I picked out some 4"x6" and 5"x7" acrylic frames and cardstock. I printed out the images, framed them, and voila -


These pictures sit atop the wide ledge that runs around the wall in the bathroom. I love how simple they are. And I also love that I only spent $12.30 for 7 pictures - frames and all!

January 12, 2010

Ugly but Cheap

No, that's not the name of the new country song ;) This past summer, I happened upon a great teapot with matching creamer (sadly, no sugar bowl). Since we've been having a cold spell here, I've been putting my teapot to good use just about every day.

I wanted a tea cozy to keep my tea warm, but the ones at our local British shoppe were all still Christmas. I found some really cute ones on etsy, and some expensive ones on ebay. After examining how they're made, I decided to see if I could make one myself for free.

I took a ratty dishtowel and cut off the hem to use as the insulating layer.

Then I took 2 cloth napkins that had seen better days and I tacked the dishtowel in between. After sewing two of the sides closed, I had this:

which just so happens to be the perfect height and width for my teapot :) It's not pretty, but for zero dollars, it looks pretty good to me!

November 30, 2009

Make Merry Swap


For my swap, my person is receiving this set of Christmas pillar candles:

The candles measure 6", 4", and 2". While I didn't make the candles, I did decorate the outside. I hope my person enjoys them!
To decorate the candles, I bought packs of cinnamon sticks at the dollar store, and one pack of mini Christmas embellishments. Using a sharp knife, I scored the straighter cinnamon sticks the desired length and then snapped them. With my hot glue gun, I then glued them one by one around the perimeter of the candle. After I finished with that, it was just a matter of gluing the ribbon in place and adding the trim.

August 19, 2009

WFMW: Displaying Kid Art

Over the past three years, I have collected a small pile of scribbles that my son has created. He doesn't ask to draw very often, so when he does create something, I want to keep it. I had been simply keeping everything in a pile, but I wanted a way to display the artwork and keep it protected. Our current house doesn't have any space for me to hang a collection of cheap frames, so I happened upon this solution:
I covered the large cabinet in our only hallway with his art! Each piece is held into place by clear contact paper. The contact paper not only sticks the art to the cabinet, it also protects each drawing while making it easy to take down when I want to display different items. When I remove a work, the front of the drawing is still protected by the contact paper if I want to keep it safe someplace else. This quick, cheap, and easy method of displaying art definitely works for me!
To see more great tips and ideas, visit We are THAT Family!

March 25, 2009

Easy (and free!) Wall Art

I recently rearranged my kitchen to make room for an island (more on that in a future post). After some furniture was moved about, I was left with an empty wall. I abhor empty walls. I searched around for some vintage/retro art that I liked, but I couldn't' find anything that struck me as "it." Thinking on what The Nester says about shopping the house, I looked around to see what I could use to solve my problem.
I found:

1 16" x 20" poster frame, minus the glass.

Since the frame was missing it's glass, I decided to have my art be 3D. I knew that I needed to disguise the cardboard, so I covered it with black construction paper. I initially was going to spray paint the cardboard, but it was raining outside.
As you can see, 3 sheets of construction paper didn't quite cover it completely, but it covered enough for my purpose.
On the cardboard, I stretched out a clean, pressed apron that my best friend Z gave me for a housewarming present. I love this apron, and I wear it a lot. However, I was starting to worry that I might mess it up if I kept wearing it. As you can tell, the apron strings are kinda messy in the back, but it doesn't matter. I used masking tape because I know I can peel the tape off the apron and the cardboard with no damage done if I change my mind. I popped the cardboard into the frame -
Tada! Nearly instant free art!
I thought the art still needed a little something, so I made a bow out of some ribbon that was on a present I received last fall.

February 17, 2009

WFMW: Cheap & Crafty Present

Before I begin, I must apologize for the poor picture quality. The finished product looked much nicer in person. BB had discovered my hiding spot for the gift and had played with the present 5 minutes before DH was due home. I threw the present back together and snapped a quick pic right before I gave it to DH.

My hubby is hard to shop for without going to a video game store. I wanted to get him something more personal than a new game for Valentine's Day, so I copied the candy bar bouquets you see at the grocery store this time of year. Mine isn't as fancy as the store-bought ones, but I easily could have added some fancy paper. I knew DH wouldn't care about that, though, so I saved myself the trouble. I used one of our large drinking glasses, placed a glass votive holder inside the glass to add more weight to the cup, and then filled it up with red marbles. I then took assorted candy bars, taped them to skewer sticks, and stuck the sticks in between the marbles. To finish it, I added some shredded tissue paper on top and tied some extra ribbon I had around the glass. Since I used so many materials that I already had on hand, the total cost of the present was only $4! DH was very impressed with my creative frugality!

February 2, 2009

The Reason for My Absence

Some of you may have noticed that I didn't blog much at all last week. I didn't intend to take a break, I just got caught up in a project. I tend to focus very much on one thing at a time and neglect everything else. Hopefully I'll post more this week - and clean my house!
My sister is having a baby boy, due in late May. This is her first child, and he was very much a surprise. I thought that making something for her would help her feel a bit better about becoming a mom. My only crafting is scrapbooking, so I made her a scrapbook/baby book for her son's first year. She is decorating the nursery in Noah's Ark.

Cover page - I left spaces for her to journal things throughout the book.

I found the perfect embellishments for this page after I had finished the page. Don't you hate when that happens? I seriously debated about redoing the page, but I hated to waste scrapbook supplies.
There are actually several shower pages in the book. I don't know how many showers she is having, or how many gifts she will receive. I left some of the pages blank so that she can just list who gave what if she doesn't have enough pictures. I also included a space for invitations.
Obviously after baby is born. Did you know that I couldn't find any stickers or other embellishments for labor and delivery? That is definitely an overlooked area.
The page on the left is for recording height and weight, while the page on the right is for immunizations. I wanted to do something cute and clever for the height and weight, but I couldn't make anything that was also easy to read at a glance. I covered the page on the right with contact paper so that she can slide the sheet out of the page protector and tape the immunization record directly onto the page. I figure it will be harder to lose the record that way. ;)
Baby's first bath page. Somewhere, I have a picture of my sister getting her first bath. I'm going to unearth the picture and stick a copy of it in the book.
Two of the six Christmas pages. This page is my favorite. I made the photo spaces look like presents to coordinate with the present background paper. I'm going to do a page like this for BB's book as well.
First tooth page and dental chart. I'll be posting on how I drew this dental chart on Wednesday.
I didn't know how this page was going to look when I started it, but I really like the color scheme.
My sister likes to take black and white pictures, so I gave her a few pages to do just that. Is it just me, or does everyone look better in black and white pictures?
I'm betting that the kid will walk before he's one, but you really never know. BB started walking literally a few days before his first birthday.
First birthday pages. It's impossible to know what the birthday theme is going to be just yet, so I went with bright colors. I figure Sesame Street, Thomas, and Curious George will all go with these colors.
Aren't you glad I didn't make you look at all 46 pages? Now that I've done this book, I really want to work more on BB's book, which has been sadly neglected. A question - if you scrapbooked before you had kids, do you just incorporate the kid pages into existing scrapbooks, or do you have a separate book for each kid? I have a special pregnancy scrapbook and a baby's first year scrapbook, but I haven't been able to decide what to do now. Also, does anyone absolutely love their scrapbook supply organizer? I have limited space, so I have to keep my stuff packed up when it's not in use. I need to find some way to organize things without having them out in the open. There's so many products out there that I'm stumped as to what works the best. Suggestions?

November 17, 2008

Crafty Christmas

As Z mention in this post, we got together last week to create some Christmas crafts. Here is my favorite craft of the ones that we have done so far:
These are so simple to make - you use a mini pinecone for the body, half of a popsicle stick for each ski, and toothpicks for the ski poles. Top the pinecone with a 1" wooden ball and a hat made out of a sweater scrap (or a pipe cleaner if you want earmuffs). Dab on a little paint for the face and the snow, and voila - a mini ski person! We just might make some more of these when we meet again this Wednesday, or we might do something else...
UPDATED: Be sure to check out Antique Mommy for more holiday crafts!

August 20, 2008

Top 10 Things I've Learned

...While Trying to Apply a Decorative Edge to a Wood Shelf:
10. Look to see if you have enough paint to cover all of the wood before you start painting.
9. Just because two containers of paint both say "white," doesn't mean that they are the same shade of white.
8. Cut all of the pieces and make sure that they fit together before gluing any pieces in place.
7. Glued wood is hard to take apart.
6. Make sure that the wood is in its correct place before gluing.
5. Do not attempt to smooth hot glue with your finger. Hot glue is hot.
4. When you cut corners, you lose length.
3. It's important to understand angles before you begin to cut corners.
2. A well-placed pretty linen over the edge of the shelf will cover a multitude of flaws.
1. Get someone else to do it.

August 14, 2008

Artistic Endeavor

Next weekend, DH and my dad will replace the nasty carpet in our living room with hardwood flooring. Along with the new flooring, I am sprucing up the rest of the living room with some artwork and better curtains. I saw this picture at Snobby Mobby last Friday and I liked it, which is pretty rare for me. I have a hard time buying pictures and decorative items, mainly because I am too picky. Since I happened to actually like the picture, I went ahead and bought it using my 40% coupon. Now that I've had the picture for a few days, I have buyer's remorse. This typically happens to me when I buy stuff like this. Yesterday afternoon, I decided to see if I could make a companion picture to go along with the one I bought. The picture I make isn't as fancy, but it was cheap. Riding on the wave of success from the picture I created, I made another picture to go along with that one. What do you think of my handiwork? After making these two pictures, I believe that I am taking the first picture back to the store for a refund. The picture I bought is prettier than pictures I made, but I can't beat the cost of my pictures. I spent $25.68 on the store-bought picture, and $1.34 on the two handmade pictures ((I already had the frames and some of the materials). That comes out to a savings of $24.34. Pretty thrifty, huh?